Luftfilterkasten mit einem neuen Luftfilter einbauen.
![](https://image.jimcdn.com/app/cms/image/transf/dimension=564x10000:format=jpg/path/sf92500d437a72b0d/image/i26ae066142647ddd/version/1586462099/image.jpg)
Halterung für Luftfilterkasten mit Entlüftungsschläuchen.
![](https://image.jimcdn.com/app/cms/image/transf/dimension=564x10000:format=jpg/path/sf92500d437a72b0d/image/i159583fa4a7e6aa1/version/1586462134/image.jpg)
Der Innenkotflügel wird montiert. Luftfilterkasten mit Halterung und Kühlwasserbehälter sind schon dran.
![](https://image.jimcdn.com/app/cms/image/transf/dimension=564x10000:format=jpg/path/sf92500d437a72b0d/image/ib5d891355341c0cf/version/1586462173/image.jpg)
Die Schwinge wird eingesetzt, neue Lager sind drin und hochfestes Lagerfett von Castrol mit grüner Farbe dick aufgetragen.
![](https://image.jimcdn.com/app/cms/image/transf/dimension=564x10000:format=jpg/path/sf92500d437a72b0d/image/ie7c64b530bb43c56/version/1586462220/image.jpg)
Die Schwinge mit Kardangehäuse ist eingebaut.
![](https://image.jimcdn.com/app/cms/image/transf/dimension=564x10000:format=jpg/path/sf92500d437a72b0d/image/i619005ec20001ba2/version/1586462258/image.jpg)
Nun kommen die Federbeine rein. Die sind mit Messingbuchsen um Spiel zu vermeiden.
![](https://image.jimcdn.com/app/cms/image/transf/dimension=564x10000:format=jpg/path/sf92500d437a72b0d/image/i9f62e081e7011176/version/1586462313/image.jpg)
Die Federbeine sind eingebaut.
![](https://image.jimcdn.com/app/cms/image/transf/dimension=564x10000:format=jpg/path/sf92500d437a72b0d/image/ie324261423acb8e8/version/1586462354/image.jpg)
Das Bremsgestänge mit reichlich salzwasserbeständigen Fett wird eingesetzt.
![](https://image.jimcdn.com/app/cms/image/transf/dimension=564x10000:format=jpg/path/sf92500d437a72b0d/image/i786d81a178eecedb/version/1586462386/image.jpg)
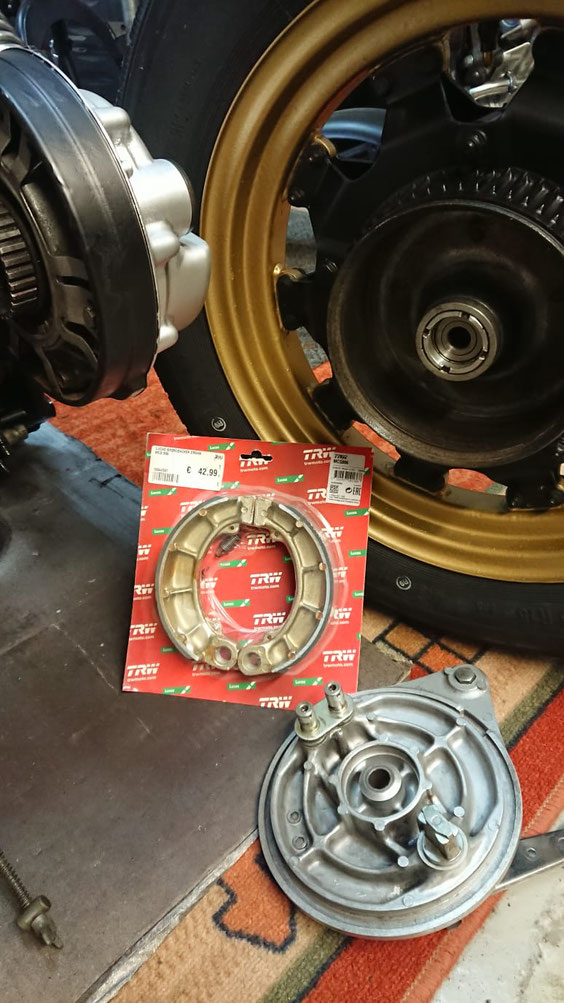
Die Trommelbremse hinten bekommt neue Bremsbacken, im Hinterrad sind neue Lager eingesetzt, gekapselte, die halten ewig!
![](https://image.jimcdn.com/app/cms/image/transf/dimension=564x10000:format=jpg/path/sf92500d437a72b0d/image/ic13a23d0ef8eccf7/version/1586462436/image.jpg)
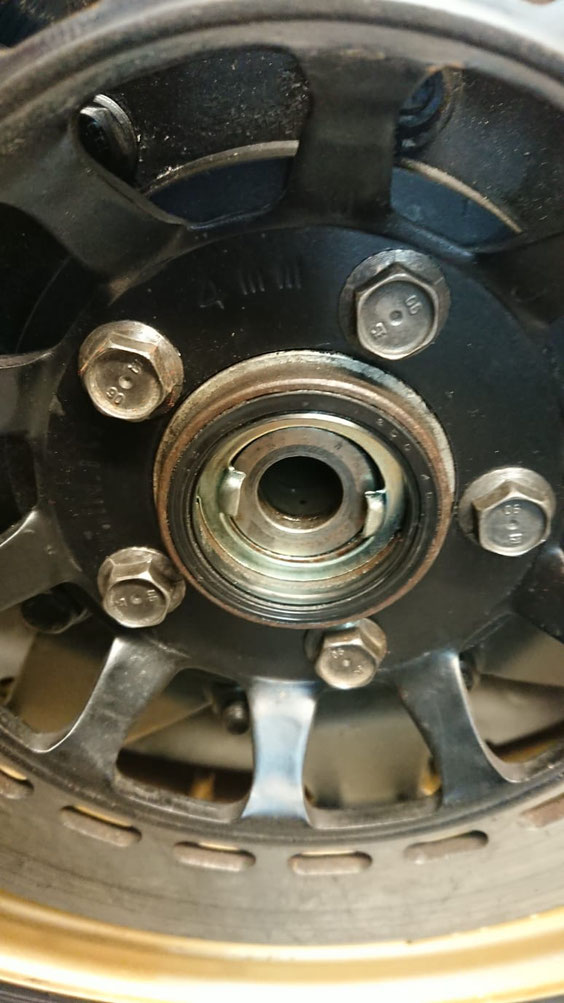
Die Detailaufnahme des gekapselten Radlagers. Man sieht keine Kugel = gekapselt.
![](https://image.jimcdn.com/app/cms/image/transf/dimension=564x10000:format=jpg/path/sf92500d437a72b0d/image/ie98153f3fd81655d/version/1586462476/image.jpg)
Die neuen Bremsbacken auf dem Träger
![](https://image.jimcdn.com/app/cms/image/transf/dimension=564x10000:format=jpg/path/sf92500d437a72b0d/image/id909e9d8da654495/version/1586462513/image.jpg)
Das Hinterrad ist eingebaut
![](https://image.jimcdn.com/app/cms/image/transf/dimension=564x10000:format=jpg/path/sf92500d437a72b0d/image/if40bc4286f660d57/version/1586462543/image.jpg)
Nun muss der neu aufgebaute Motor rein
![](https://image.jimcdn.com/app/cms/image/transf/dimension=564x10000:format=jpg/path/sf92500d437a72b0d/image/iaaf886d4f0f82b51/version/1586462583/image.jpg)
Hier von der anderen Seite. Da sieht man gut, keine Nachstellung für Kettenspanner = der gute automatische ist drin!
![](https://image.jimcdn.com/app/cms/image/transf/dimension=564x10000:format=jpg/path/sf92500d437a72b0d/image/i165dad34a64e72ac/version/1586462623/image.jpg)
Die Motorhalteschrauben sind drin
![](https://image.jimcdn.com/app/cms/image/transf/dimension=564x10000:format=jpg/path/sf92500d437a72b0d/image/iaf9251d3db295cad/version/1586462660/image.jpg)
Jetzt kommt die Schwingengabel rein
![](https://image.jimcdn.com/app/cms/image/transf/dimension=564x10000:format=jpg/path/sf92500d437a72b0d/image/i56ee4a69dd837417/version/1586462795/image.jpg)
Und mit Vorderrad und provisorisch verbauten Seitenständer steht die CX auch wieder von alleine.
Alle Lager und Schrauben sind natürlich neu!
![](https://image.jimcdn.com/app/cms/image/transf/dimension=564x10000:format=jpg/path/sf92500d437a72b0d/image/i09faf39b909c48e9/version/1586462849/image.jpg)
Lenkkopflager neu ist nun auch verbaut
![](https://image.jimcdn.com/app/cms/image/transf/dimension=564x10000:format=jpg/path/sf92500d437a72b0d/image/i7273c573e18e72d5/version/1586888416/image.jpg)
Der Kabelbaum ist gereinigt, Scheuerstellen ausgebessert, also neu isoliert und alle Kontakte blank gebürstet und Stecker mit Kontaktspray geflutet
![](https://image.jimcdn.com/app/cms/image/transf/dimension=564x10000:format=jpg/path/sf92500d437a72b0d/image/i2e69419e6e38e1c3/version/1586888480/image.jpg)
Kabelbaum vorläufig verlegt
![](https://image.jimcdn.com/app/cms/image/transf/dimension=564x10000:format=jpg/path/sf92500d437a72b0d/image/i3ba36a0a6ced6222/version/1586888515/image.jpg)
Anlasserrelais neben Batterie ist montiert
![](https://image.jimcdn.com/app/cms/image/transf/dimension=564x10000:format=jpg/path/sf92500d437a72b0d/image/i55a59d0524dc1f6a/version/1586888550/image.jpg)
Und jetzt kommt die Bremsanlage vorne dran. Die Kolben sind gängig gemacht, neue Dichtungen drin und neue Bremsbeläge natürlich
![](https://image.jimcdn.com/app/cms/image/transf/dimension=564x10000:format=jpg/path/sf92500d437a72b0d/image/id3d424218baa325f/version/1586888600/image.jpg)
Mitnehmer für Tacho ist neu und eingesetzt
![](https://image.jimcdn.com/app/cms/image/transf/dimension=564x10000:format=jpg/path/sf92500d437a72b0d/image/i14bf41edc485a9f2/version/1586888633/image.jpg)
Kotflügel vorne mit Halter und Hutmuttern aus Edelstahl sind dran
![](https://image.jimcdn.com/app/cms/image/transf/dimension=564x10000:format=jpg/path/sf92500d437a72b0d/image/i84a5a8f4c3c465f7/version/1586888679/image.jpg)
Mattschwarz ist farbig genug 😂
![](https://image.jimcdn.com/app/cms/image/transf/dimension=564x10000:format=jpg/path/sf92500d437a72b0d/image/if034e6f6ead1dd7a/version/1586888714/image.jpg)
Neue Bremsbeläge mit Kupferpaste sind eingesetzt
![](https://image.jimcdn.com/app/cms/image/transf/dimension=564x10000:format=jpg/path/sf92500d437a72b0d/image/if29325625f8fc4cb/version/1586888755/image.jpg)
Original mit den anti Dröhnplättchen
![](https://image.jimcdn.com/app/cms/image/transf/dimension=564x10000:format=jpg/path/sf92500d437a72b0d/image/i0d32858757f68b3b/version/1586888807/image.jpg)
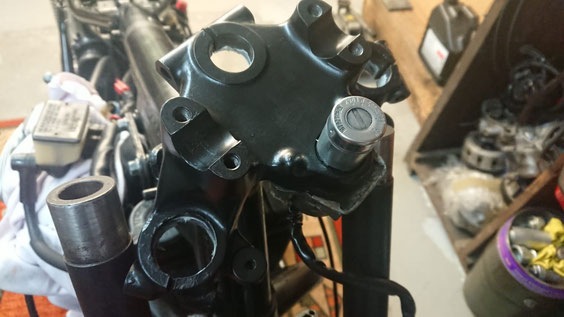
Die Gabelbrücke oben aufbereitet mit Zündschloss
![](https://image.jimcdn.com/app/cms/image/transf/dimension=564x10000:format=jpg/path/sf92500d437a72b0d/image/i526b5962004e8b3c/version/1586888990/image.jpg)
Lenkkopf und Standrohre der Gabel mit Salzwasserbeständigen Fett eingeschmiert
![](https://image.jimcdn.com/app/cms/image/transf/dimension=564x10000:format=jpg/path/sf92500d437a72b0d/image/if2454e271d1746f9/version/1586889102/image.jpg)
Hier noch ein Bild
![](https://image.jimcdn.com/app/cms/image/transf/dimension=564x10000:format=jpg/path/sf92500d437a72b0d/image/i9701356130227e09/version/1586889140/image.jpg)
Und nun fertig zusammen gebaut
![](https://image.jimcdn.com/app/cms/image/transf/dimension=564x10000:format=jpg/path/sf92500d437a72b0d/image/i0fbef9a83cb8e8af/version/1586889171/image.jpg)
Was passt da besser als ein Bölkstoff 😃
![](https://image.jimcdn.com/app/cms/image/transf/dimension=564x10000:format=jpg/path/sf92500d437a72b0d/image/ia632dbe9dd9dde39/version/1586889209/image.jpg)
Nun schon der Lenker montiert
![](https://image.jimcdn.com/app/cms/image/transf/dimension=564x10000:format=jpg/path/sf92500d437a72b0d/image/i924cad947b336bec/version/1586889269/image.jpg)
Mit Chokezug und Kabelbaum
![](https://image.jimcdn.com/app/cms/image/transf/dimension=564x10000:format=jpg/path/sf92500d437a72b0d/image/i91eddcc6ddf4fb61/version/1586889299/image.jpg)
Jetzt kommt die Bremsanlage dran
![](https://image.jimcdn.com/app/cms/image/transf/dimension=564x10000:format=jpg/path/sf92500d437a72b0d/image/ib4943f32673cf80a/version/1586889335/image.jpg)
Und nun die Zündspulen
![](https://image.jimcdn.com/app/cms/image/transf/dimension=564x10000:format=jpg/path/sf92500d437a72b0d/image/i934c1800a83545f6/version/1586889369/image.jpg)
Die Verriegelung der Sitzbank mit ordentlich Fett auf den Schrauben kommen nun an den Rahmen
![](https://image.jimcdn.com/app/cms/image/transf/dimension=564x10000:format=jpg/path/sf92500d437a72b0d/image/i30cd5c37829af8d3/version/1586889412/image.jpg)
Hier nun verbaut mit eingehängten Federn
![](https://image.jimcdn.com/app/cms/image/transf/dimension=564x10000:format=jpg/path/sf92500d437a72b0d/image/i8946acd2134dde9d/version/1586889443/image.jpg)
Alte und neue Schrauben, wo ist wohl der Unterschied 😂
![](https://image.jimcdn.com/app/cms/image/transf/dimension=564x10000:format=jpg/path/sf92500d437a72b0d/image/iafc61e668d5dd310/version/1586889478/image.jpg)
Mit den neuen Schrauben lässt sich der Beiwagenrahmen gleich besser montieren
![](https://image.jimcdn.com/app/cms/image/transf/dimension=564x10000:format=jpg/path/sf92500d437a72b0d/image/ic3bd4ee35c30dee6/version/1586889512/image.jpg)
Jetzt kommt das aufbereitete Heck dran
![](https://image.jimcdn.com/app/cms/image/transf/dimension=564x10000:format=jpg/path/sf92500d437a72b0d/image/ia5992762f7ca5298/version/1586889551/image.jpg)
Alles gereinigt und auf Funktion geprüft
![](https://image.jimcdn.com/app/cms/image/transf/dimension=564x10000:format=jpg/path/sf92500d437a72b0d/image/i4de466bc973654f3/version/1586889581/image.jpg)
Steckverbinder gereinigt und mit Kontaktspray behandelt
![](https://image.jimcdn.com/app/cms/image/transf/dimension=564x10000:format=jpg/path/sf92500d437a72b0d/image/i8069139f48540df1/version/1586889622/image.jpg)
Nach der Reinigung kann man auch die Kabelfarben wieder erkennen
![](https://image.jimcdn.com/app/cms/image/transf/dimension=564x10000:format=jpg/path/sf92500d437a72b0d/image/i30a3b676f8d5bcec/version/1586889656/image.jpg)
Das heck mit dem Haltebügel für den Sozius ist verbaut. Gefällt mir aber irgendwie nicht....
![](https://image.jimcdn.com/app/cms/image/transf/dimension=564x10000:format=jpg/path/sf92500d437a72b0d/image/i3de748bf2869f57f/version/1586889696/image.jpg)
Aber erstmal kommt die Front dran
![](https://image.jimcdn.com/app/cms/image/transf/dimension=564x10000:format=jpg/path/sf92500d437a72b0d/image/i724f29f1db3c560b/version/1586889731/image.jpg)
Verkleidung verbaut und Kabelbaum ist durchgezogen
![](https://image.jimcdn.com/app/cms/image/transf/dimension=564x10000:format=jpg/path/sf92500d437a72b0d/image/ied715ed61f5c4b41/version/1586889762/image.jpg)
Auch hier alle Kabel gereinigt, Verbindungen geprüft und Stecker mit Kontaktspray geflutet
![](https://image.jimcdn.com/app/cms/image/transf/dimension=564x10000:format=jpg/path/sf92500d437a72b0d/image/i82d543836f18ee49/version/1586889801/image.jpg)
Jetzt eine neue Energiequelle, Batterie von Exide
![](https://image.jimcdn.com/app/cms/image/transf/dimension=564x10000:format=jpg/path/sf92500d437a72b0d/image/i5d38e287f4674608/version/1586889839/image.jpg)
Sieht schon fast nach Motorrad aus aber noch lange nicht nach Gespann.
![](https://image.jimcdn.com/app/cms/image/transf/dimension=564x10000:format=jpg/path/sf92500d437a72b0d/image/ic6fa7036c3c9d1d8/version/1586889888/image.jpg)
Nun aber erstmal Kühler mit Flüssigkeit befüllen
![](https://image.jimcdn.com/app/cms/image/transf/dimension=564x10000:format=jpg/path/sf92500d437a72b0d/image/i79a6d1b173c2629e/version/1586889921/image.jpg)
Am Heck ist jetzt auch der neue Rückstrahler angekommen
![](https://image.jimcdn.com/app/cms/image/transf/dimension=564x10000:format=jpg/path/sf92500d437a72b0d/image/ifeb95f6a36672699/version/1586889956/image.jpg)
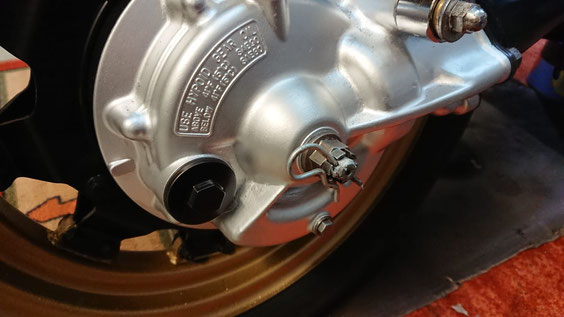
Der Kardan ist mit neuem Öl befüllt und Dauersplint an der hinteren Achse gesetzt
![](https://image.jimcdn.com/app/cms/image/transf/dimension=564x10000:format=jpg/path/sf92500d437a72b0d/image/i9faf3ded01aec2b4/version/1586889996/image.jpg)
Ganz wichtig, neuer Ölfilter mit Feder und der Beilagscheibe
![](https://image.jimcdn.com/app/cms/image/transf/dimension=564x10000:format=jpg/path/sf92500d437a72b0d/image/i88db85f4747954ad/version/1586890043/image.jpg)
Bestes neues Öl gehört selbstverständlich dazu
![](https://image.jimcdn.com/app/cms/image/transf/dimension=564x10000:format=jpg/path/sf92500d437a72b0d/image/i6c839b209a1f80b2/version/1586890075/image.jpg)
Sicherungskasten mit Ersatzsicherung
![](https://image.jimcdn.com/app/cms/image/transf/dimension=564x10000:format=jpg/path/sf92500d437a72b0d/image/i0949b5b4d0ba62e8/version/1586890109/image.jpg)
Jetzt wird der überholte Vergaser eingebaut. Schön zu sehen, es ist die 37 kW also 50 PS Variante
![](https://image.jimcdn.com/app/cms/image/transf/dimension=564x10000:format=jpg/path/sf92500d437a72b0d/image/i6eaf883d99983f3e/version/1586890149/image.jpg)
Ein neuer Bremslichtschalter muss auch sein
![](https://image.jimcdn.com/app/cms/image/transf/dimension=564x10000:format=jpg/path/sf92500d437a72b0d/image/i67a6e26e5ea5d3ef/version/1586890184/image.jpg)
Der Vergaser ist eingebaut
![](https://image.jimcdn.com/app/cms/image/transf/dimension=564x10000:format=jpg/path/sf92500d437a72b0d/image/ia954915c66c31313/version/1586890222/image.jpg)
Neue Dichtungen für die Krümmer rein und reichlich Kupferpaste auf die Stehbolzen
![](https://image.jimcdn.com/app/cms/image/transf/dimension=564x10000:format=jpg/path/sf92500d437a72b0d/image/id549b72e2cace3db/version/1586890268/image.jpg)
Weil noch so viel Kupferpaste übrig ist, gleich noch reichlich davon in den aufbereiteten Mitteltopf und auf die mit 37 kW also 50 PS gestempelten Krümmer geschmiert
![](https://image.jimcdn.com/app/cms/image/transf/dimension=564x10000:format=jpg/path/sf92500d437a72b0d/image/i63d3e79fd834555e/version/1586890316/image.jpg)
Der Mitteltopf mit den Klemmschellen
![](https://image.jimcdn.com/app/cms/image/transf/dimension=564x10000:format=jpg/path/sf92500d437a72b0d/image/i06dce7bbe81919c6/version/1586890364/image.jpg)
Hier bereits mit aufbereiteten Krümmerhaltern montiert
![](https://image.jimcdn.com/app/cms/image/transf/dimension=564x10000:format=jpg/path/sf92500d437a72b0d/image/i763bef72ee526dc8/version/1586890397/image.jpg)
Ein Gesamtbild - nur immer noch kein Gespann!
![](https://image.jimcdn.com/app/cms/image/transf/dimension=564x10000:format=jpg/path/sf92500d437a72b0d/image/ie3c3e77da7b75f73/version/1586890447/image.jpg)